

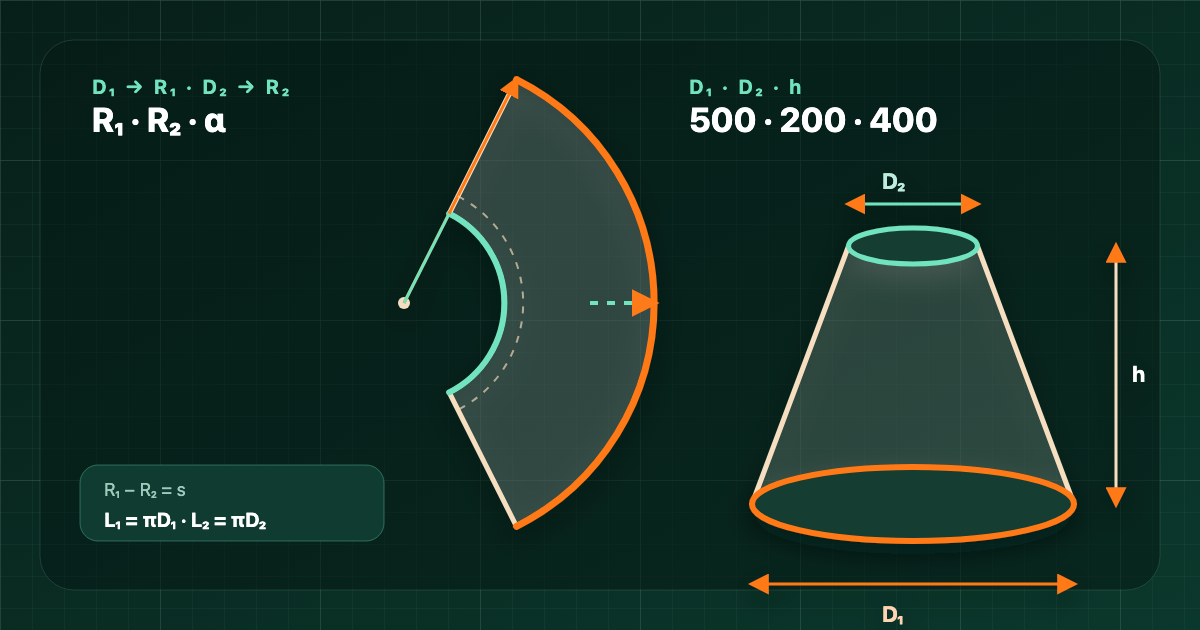
A truncated cone does not unfold into a rectangle. Its ideal lateral wall becomes an annular sector whose two radii and included angle are fixed by the finished diameters and vertical height. This guide derives that development, works a complete example, verifies the result by independent arc and area paths, and separates mathematical geometry from the fabrication allowances a real job may require.
Quick answer: truncated-cone flat-pattern formulas
A truncated cone, or frustum, opens into an annular sector rather than a complete disk. Start from the large diameter D₁, small diameter D₂, and vertical height h. Halve the diameters, calculate the wall's slant height, extend the similar triangles to obtain the two layout radii, and choose the sector angle that makes each developed arc equal the matching cone circumference.
| Result | Formula |
|---|---|
| Half-diameters | r₁ = D₁ ÷ 2 · r₂ = D₂ ÷ 2 |
| Wall slant height | s = √(h² + (r₁ − r₂)²) |
| Outer pattern radius | R₁ = s × r₁ ÷ (r₁ − r₂) |
| Inner pattern radius | R₂ = s × r₂ ÷ (r₁ − r₂) |
| Included sector angle | α = 360° × r₁ ÷ R₁ |
| Outer and inner arc lengths | L₁ = πD₁ · L₂ = πD₂ |
| Lateral material area | A = π(r₁ + r₂)s |
What the annular-sector pattern represents
Imagine cutting the frustum along one straight generator and unrolling its lateral wall without stretching it. Both circular ends become arcs sharing one virtual apex. The result is the region between two concentric sector arcs, bounded by two straight radial cut edges. Every output has a specific physical role in marking or checking that region.
- R₁ is the distance from the virtual apex to the developed large-end edge; it is the outer compass radius.
- R₂ is the distance from the same apex to the developed small-end edge; it is the inner compass radius.
- The difference R₁ − R₂ equals the actual wall slant height between the two finished ends.
- The sector angle α controls how much of the full annulus remains after the layout is cut.
- The outer developed arc must equal the large-end circumference πD₁, while the inner arc must equal πD₂.
- The region between the arcs has the same ideal area as the frustum's lateral surface.
The flat pattern is therefore not drawn with the finished end radii. Those radii describe the formed part; R₁ and R₂ are longer layout radii measured from an extended apex. Confusing the two coordinate systems makes both the sector angle and the arc lengths wrong, even when the input diameters are correct.
Derive the outer radius, inner radius, and sector angle
Let r₁ and r₂ be the finished large and small radii. A right triangle through the cone axis gives the wall slant s. Similar triangles then scale that finite wall segment back to the virtual apex. Finally, the no-stretch condition fixes the angle because the developed outer arc must close around the large end.
Convert both diameters to radii
r₁ = D₁ ÷ 2 · r₂ = D₂ ÷ 2The calculation uses radial differences, so halve each finished diameter before applying similar triangles.Find the wall slant height
s = √(h² + (r₁ − r₂)²)The wall slant is the hypotenuse formed by vertical height and the difference between the finished radii.Extend to the outer pattern radius
R₁ = s × r₁ ÷ (r₁ − r₂)The outer layout radius scales the wall slant by the ratio of the large radius to the radial difference.Extend to the inner pattern radius
R₂ = s × r₂ ÷ (r₁ − r₂)The inner layout radius uses the same similarity ratio with the small finished radius.Set the included sector angle
α = 360° × r₁ ÷ R₁This angle makes the arc at R₁ equal the large-end circumference rather than an arbitrary fraction of a circle.Preserve both end circumferences
L₁ = πD₁ · L₂ = πD₂Unrolling without stretch preserves length, so the two developed arcs equal the two original circumferences.Calculate the ideal lateral area
A = π(r₁ + r₂)sThis is the standard lateral area of an ideal frustum and also equals the area of the annular sector.Keep full precision through the chain. Rounding s before calculating R₁ and R₂ changes the sector radii, and rounding the angle before checking the arcs can make an otherwise consistent development appear to disagree. Apply display rounding only after every dependent value has been calculated.
Worked example: D₁ = 500, D₂ = 200, h = 400
Consider an ideal truncated cone with large diameter D₁ = 500, small diameter D₂ = 200, and vertical height h = 400. Because every input uses the same length unit, every length output uses that unit and the lateral area uses its square. The unrounded values below are retained internally before the displayed results are rounded.
Recover the finished radii
r₁ = 250 · r₂ = 100 · r₁ − r₂ = 150The large and small finished radii are half their diameters, and their difference is the horizontal leg of the slant triangle.Calculate the slant height
s = √(400² + 150²) ≈ 427.200Combining the vertical height and radial difference gives the true straight distance along the wall.Calculate both pattern radii
R₁ ≈ 712.000 · R₂ ≈ 284.800Similar triangles extend that wall to the common virtual apex and produce the two compass radii.Calculate the sector angle
α = 360° × 250 ÷ 712.000 ≈ 126.404°The angle is the fraction of a full turn required for the outer arc to equal the large-end circumference.Calculate both developed arcs
L₁ = π × 500 ≈ 1570.796 · L₂ = π × 200 ≈ 628.319The unrolled edges retain the circumferences of the formed large and small ends.Calculate the ideal lateral area
A = π × (250 + 100) × 427.200187 ≈ 469731.139Using the unrounded slant gives the independently recomputed ideal wall area without carrying display-rounding error into the result.| Result | Symbol | Rounded value |
|---|---|---|
| Slant height | s | 427.200 |
| Outer pattern radius | R₁ | 712.000 |
| Inner pattern radius | R₂ | 284.800 |
| Sector angle | α | 126.404° |
| Outer arc length | L₁ | 1570.796 |
| Inner arc length | L₂ | 628.319 |
| Lateral area | A | 469731.139 square units |
To lay out the ideal geometry manually, draw concentric arcs at R₁ and R₂ over the included angle α, then connect their endpoints with radial lines. The two arc lengths should match the finished circumferences before any separate seam, overlap, kerf, thickness, or forming correction is introduced.
Independent checks before using the dimensions
A useful verification changes the calculation path instead of merely repeating the same substitutions. The following relationships test similarity, preserved circumference, and area for the worked example. Small differences after display rounding are expected; large differences indicate a unit, diameter, or angle error.
- Radial-width check: 712.000312 − 284.800125 ≈ 427.200187, which recovers the unrounded slant height s.
- Similarity check: 284.800125 ÷ 712.000312 = 0.4, matching the finished-diameter ratio 200 ÷ 500 = 0.4.
- Outer-arc check: (126.404439 ÷ 360) × 2π × 712.000312 ≈ 1570.796327, matching πD₁.
- Inner-arc check: (126.404439 ÷ 360) × 2π × 284.800125 ≈ 628.318531, matching πD₂.
- Area check: (126.404439 ÷ 360)π(712.000312² − 284.800125²) ≈ 469731.139, matching π(r₁ + r₂)s.
- Dimension check: diameters, height, slant, radii, and arcs are lengths; the lateral result is in square units.
Keep units consistent and reject invalid inputs
The equations are unit-agnostic only when all three inputs share one unit. A mixed input can still produce a plausible number while describing no real part. Record the unit next to the source dimensions and validate the geometry before calculating a development.
- D₁ must be positive because the large end must have a physical diameter.
- D₂ may be zero for a full cone, but for a frustum it must be positive and smaller than D₁.
- h must be a positive perpendicular height, not the wall slant or an axial drawing dimension measured at an angle.
- Convert millimetres, centimetres, inches, or another length unit before entering the values; a label alone does not convert a number.
- Use the same reference surface for both diameters and height so that the dimensions describe one consistent ideal wall.
- Keep more internal precision than the measuring process supports, then round the final layout values appropriately for the job.
What pure geometry does not include
These formulas describe an ideal zero-thickness surface. They are valuable for understanding and checking the development, but they are not a complete fabrication specification. A shop-ready pattern may require decisions that depend on material, forming method, joint design, equipment, and the dimensioning standard used on the drawing.
- Material thickness and the selected inside, outside, or neutral reference surface are not added automatically.
- A longitudinal seam, weld gap, overlap, flange, hem, or fastening allowance is not part of the pure annular sector.
- Cutting kerf and any process compensation for laser, plasma, waterjet, or manual cutting are excluded.
- Bend, rolling, springback, and forming allowances require process knowledge beyond the ideal cone equations.
- Drawing tolerances, datum choices, inspection requirements, and fit-up sequence remain authoritative for the physical part.
- The calculation does not certify manufacturability, machine settings, material behavior, or final dimensional accuracy.
Treat R₁, R₂, α, and the two arc lengths as a transparent geometric baseline. Document every production adjustment separately so another person can distinguish the mathematical development from the allowance policy. For critical work, verify the final pattern against the approved drawing and an appropriate fabrication procedure.
How the same method handles a full cone
The same method covers a full cone when the small diameter becomes zero. The inner arc collapses to the virtual apex, so the annular sector becomes an ordinary circular sector. The large diameter and height still determine the slant, outer layout radius, and included angle.
Collapse the inner boundary for a full cone
D₂ = 0 ⇒ r₂ = 0 ⇒ R₂ = 0A zero small diameter removes the inner circumference and its layout radius without changing the outer-arc condition.Verify the developed radial width
R₁ − R₂ = sFor both a full cone and a frustum, the distance between the developed end edges equals the physical wall slant.Do not force a frustum through the full-cone shortcut by discarding a nonzero top diameter. Doing so removes real material from the calculation and changes the sector geometry. Preserve D₂ whenever the finished part has an open top or a smaller circular end.
Calculate, inspect, and verify the development
Use the free browser Circle Calculator to confirm each diameter's circumference, the Arc Length Calculator to check an arc from a pattern radius and α, and the Sector Calculator to inspect the outer sector independently. Keep the original unrounded values when comparing paths so display precision does not create a false mismatch.
On iPhone or Android, Circle Calculator's Cone Pattern workflow accepts the large diameter, small diameter, and vertical height, then shows the calculated slant, outer radius, inner radius, sector angle, both arcs, lateral area, and a live development diagram. The calculation and diagram are available without Pro; eligible Pro access adds the ideal DXF geometry export. Current availability, plans, trials, and prices remain those shown by your device's store.
The store buttons below use first-party measured redirect routes and record only an outbound visit with the article source label. An outbound visit is not an installation, subscription, purchase, or proof that an exported pattern was fabricated. No installed-app deep link is shown here because the current blog renderer exposes measured store actions, not an in-article app-opening control.
Develop the cone wall
Continue in Circle Calculator.
Enter both finished diameters and vertical height on iPhone or Android to inspect the free calculation and live flat-pattern diagram. Eligible Pro access adds an ideal DXF geometry export; it does not add job-specific thickness, seam, kerf, or tolerance decisions. Current availability and purchase terms appear in your device's store.